Rate this article :
This article was useful to you ?
Yes
No
Vous avez noté 0 étoile(s)
Sommaire
Procédure
Welcome to this comprehensive guide that will help you understand and manage the Dedicated IP option for your LWS mail service. We will define what a dedicated IP is, why it is useful for sending mail, how it differs from a shared IP, and how to order, configure and terminate this option at LWS. Our aim is to help you optimise your mail service for a better user experience.
A dedicated IP address, exclusive to your mail service, is similar to having your own numeric postcode. It protects you from the impact of the actions of other mail users, a phenomenon that can occur with a shared IP.
The main contrast between a dedicated IP and a shared IP is in the way they are used. With a dedicated IP, your mail service has its own unique numerical identifier, whereas a shared IP is used by various mail services. The shared IP can have its reputation affected by all its users. So if one of them uses the IP inappropriately, it can disrupt your ability to send email.
Using a dedicated IP to send your emails offers a number of benefits. Primarily, it strengthens the reputation of your IP, protecting it from the actions of other mail users. What's more, it gives you total control over your email activity. In the event of email delivery problems, you can detect and resolve the problem quickly, as your IP is only associated with your emails.
Before ordering a dedicated IP for your mail service, please follow the steps below:
Step 1 : First, log in to your LWS account and access the shared hosting or mail service for which you would like to order a dedicated IP option.
Step 2: Go to the "Email Addresses" section and click on the "Email Administration" icon.

You will be redirected to another page.
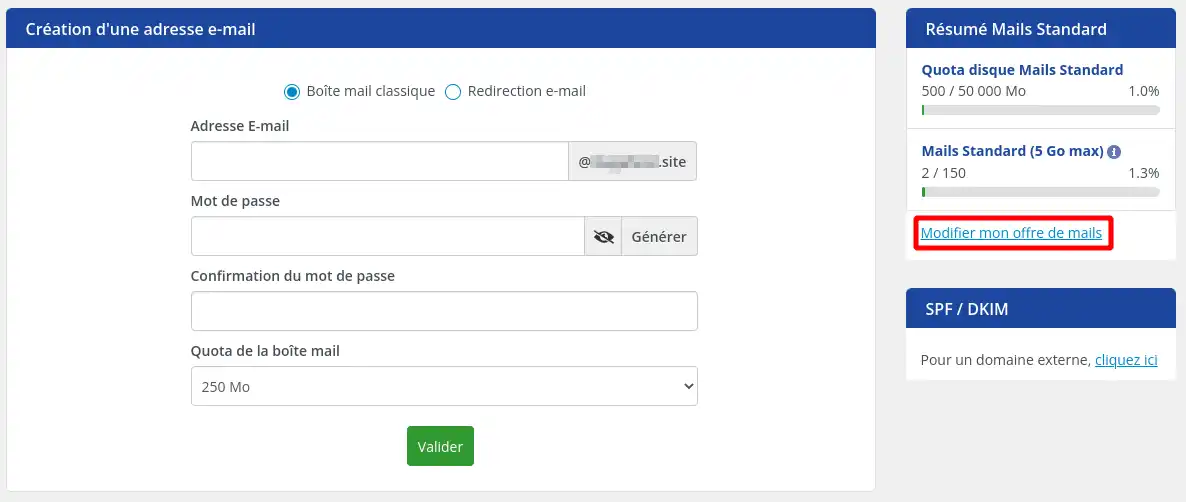
Step 3 : To order the dedicated IP option, click on the link "Modify my email offer".
A new window will appear, where you can now order your dedicated IP option by ticking the associated box.
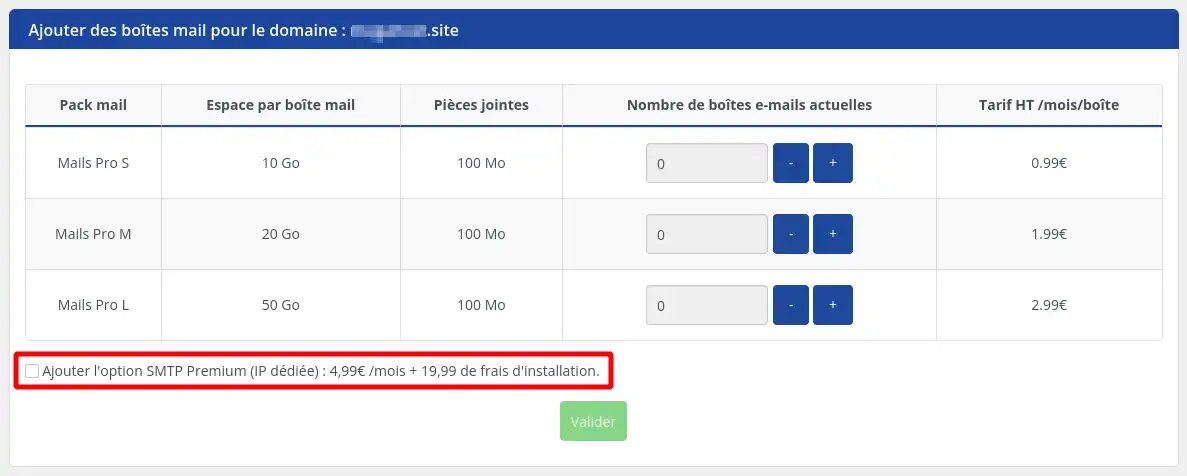
You can also order professional email addresses from this form, but this is not compulsory in order to benefit from a dedicated IP for sending your emails.
[
Once you have made your choice, complete your order by clicking on the "Confirm" button.
Step 4: You will then be redirected to the quote for your order. We invite you to pay for it using the payment method you prefer in order to finalise the process and launch the installation of the dedicated IP.
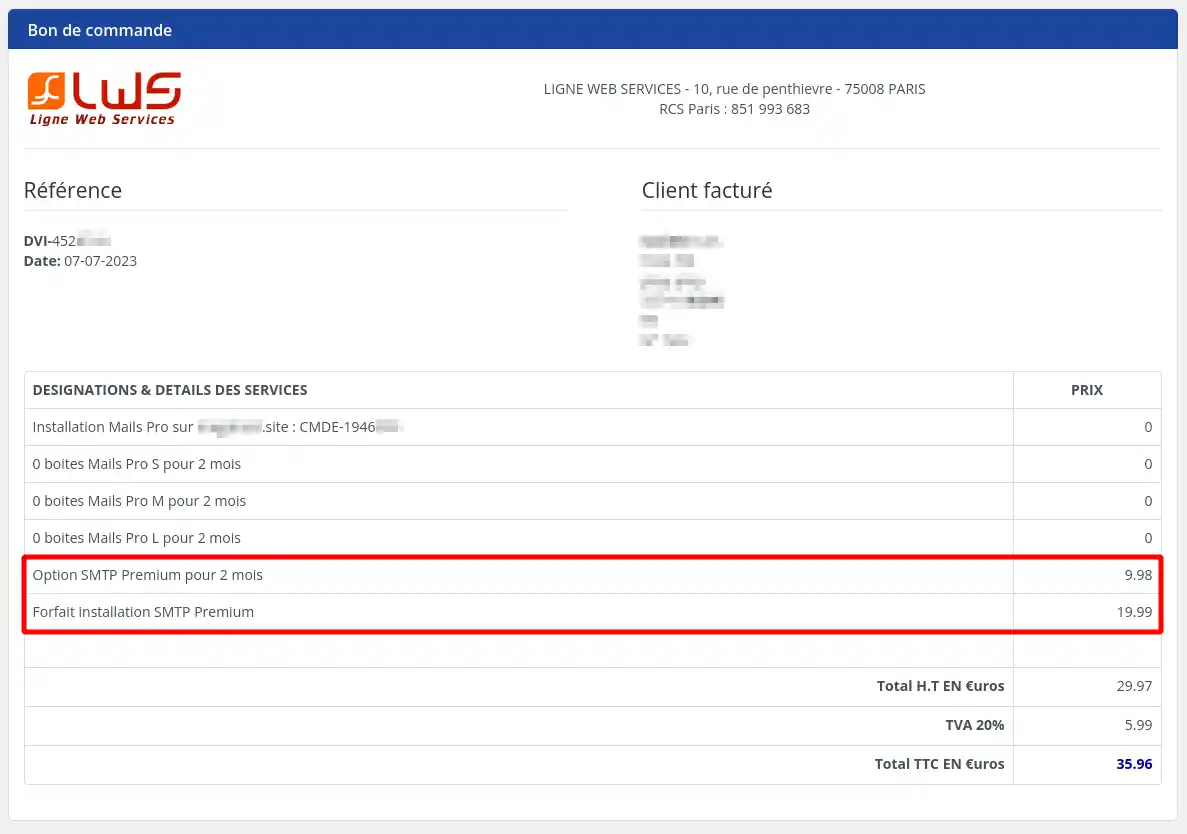
The option will be activated within the hour.
The configuration of your dedicated IP option depends on where your domain's DNS Zone is managed. Configuring the option requires you to modify and add records in your domain's DNS Zone.
If your domain's DNS Zone is managed by the LWS Panel, you won't need to do any configuration, as LWS will automatically configure it on delivery.
However, in the following cases, you will have to configure it manually:
If you are in one of the cases listed above, you need to do two things to get your Dedicated IP up and running.
To manage the DNS zone for your domain name, please refer to the following documentation:
If the DNS Zone for your domain is managed by another service provider, please contact their support department and provide them with the information below so that they can make the DNS Zone changes for your domain.
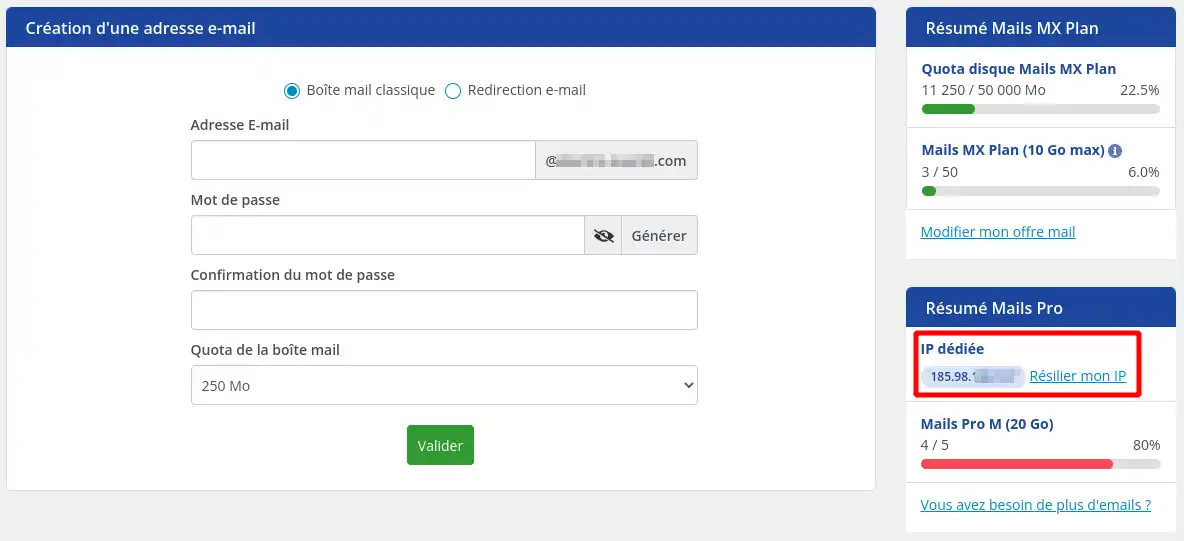
To find out the Dedicated IP of your option, you need to go to the administration page of your mail service on the LWS Panel. The Dedicated IP is displayed with your email quotas as shown in the screenshot below:
[
1) Changing the SPF record in the DNS Zone.
Step 1: Locate the TXT record with the name "@" or [domain.ext] and the value: v=spf1 ... -all (the "..." represents a series of parameters that can be more or less long).
Step 2: without deleting the parameters already saved, add the Dedicated IP of the option subscribed to by adding the parameter: IP4:[dedicated ip].
2) Adding a Type A record
Step 1: access the form for creating a DNS record in the DNS Zone of your domain name
Step 2: add the Type A record with the name ipdediee.[domain.ext ] and the value [dedicated ip].
Step 1 : First, you need to log in to your LWS account and access the shared hosting or mail service for which you want to order a dedicated IP option.
Step 2: Go to the "Email Addresses" section and click on the "Email Administration" icon.

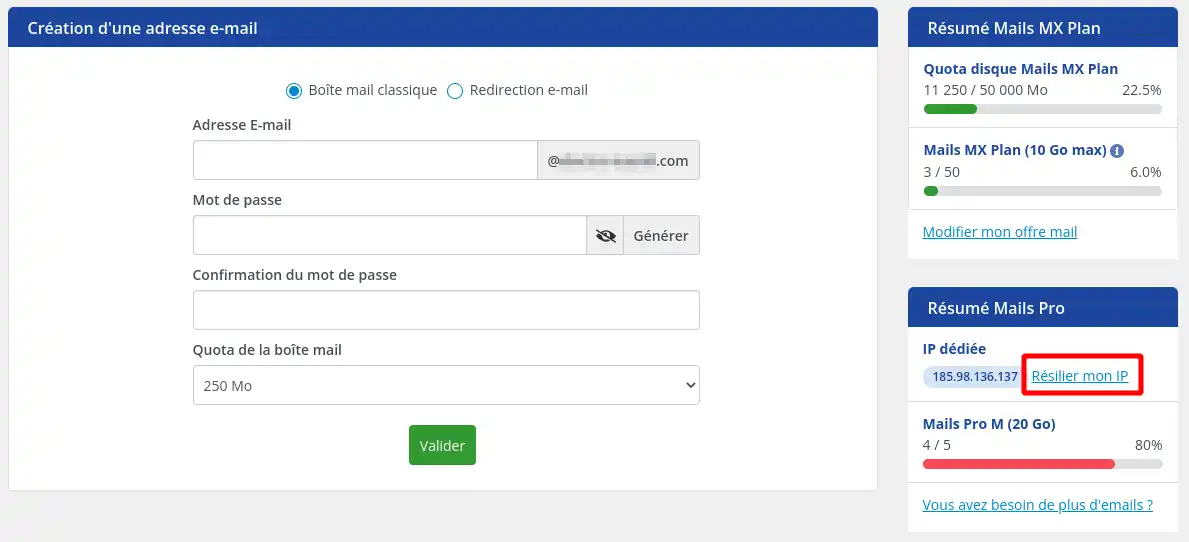
Step 3: On the page that appears, click on the link"Cancel my IP".
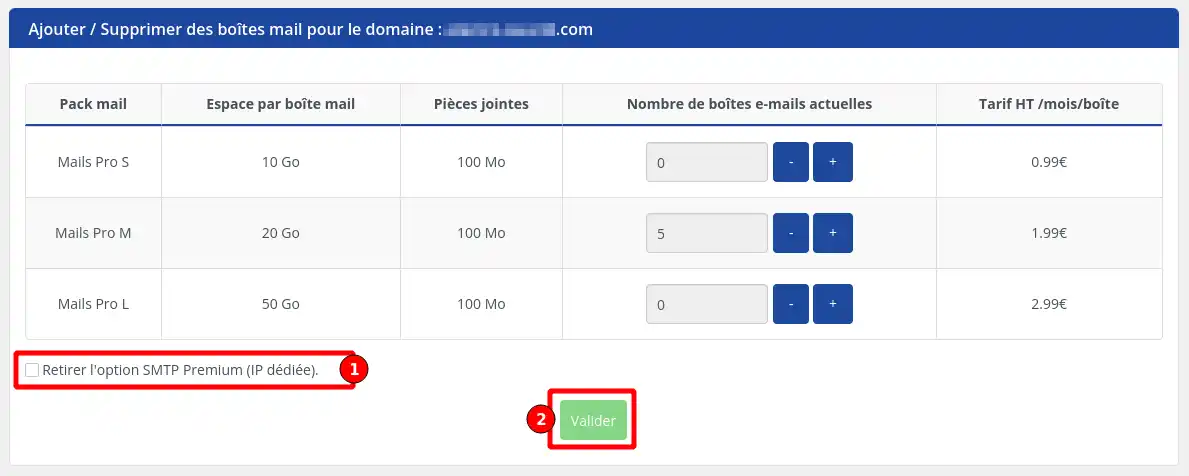
Step 4: The configuration page for your email service will then appear. You will then need to tick the box"Remove the Premium SMTP option (Dedicated IP)" (1) and then click on the"Validate" button (2).
Step 5 : You will then be redirected to the quote where you can finalise the operation by clicking on the "Confirm your order" button.
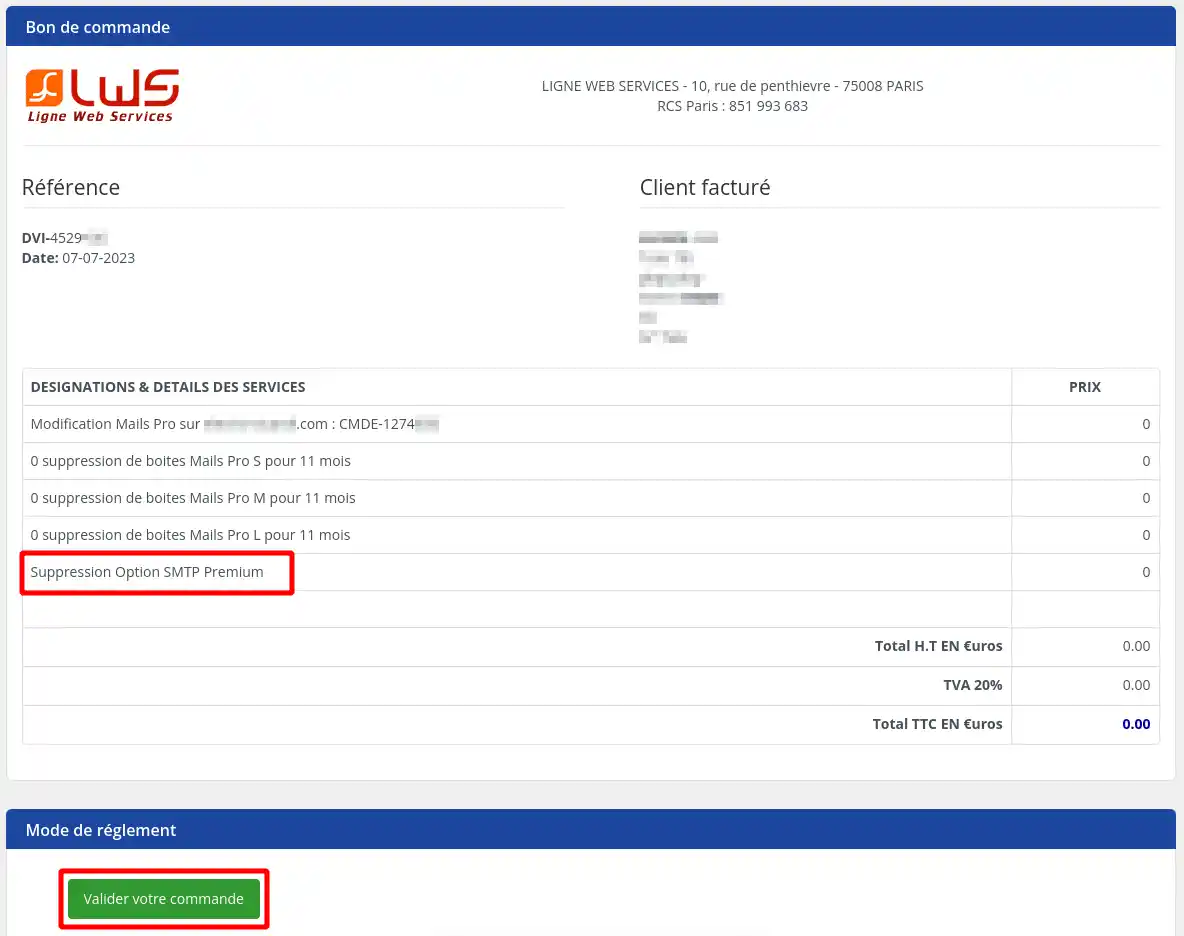
Your Dedicated IP option will then be deleted within the hour.
In conclusion, the dedicated IP option for your LWS mail service offers many advantages in terms of IP control and reputation. However, ordering, configuring and cancelling it requires some understanding. We hope this guide will help you navigate these processes easily and get the most out of your LWS mail service.
Rate this article :
This article was useful to you ?
Yes
No
1mn reading
How do I buy a business email address?
0mn reading
How do I create a Pro email address in your LWS customer area?
1mn reading
How can you easily migrate your emails between LWS Pro and Standard mail services?
1mn reading
How do I delete a Pro email address from the LWS Panel?