Rate this article :
5/5 | 1 opinion
This article was useful to you ?
Yes
No
Vous avez noté 0 étoile(s)
Sommaire
Procédure
PhpMyadmin is a free open source platform used to administer your MySQL database using a web browser.
This article explains how to manage your database using this utility.
To manage a MySQL database, connect to your phpmyadmin interface:
For LWS Standard Linux shared packages
For cPanel/CLoudCP packages
For VPS packages
To create a table, first select the database where you want to add the table.
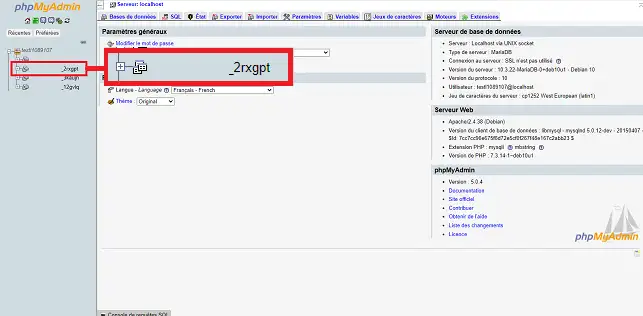
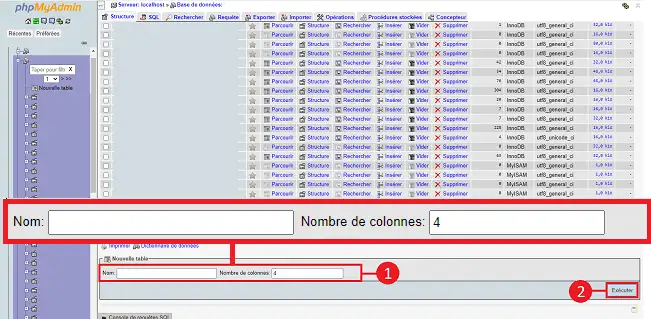
Scroll to the bottom of the page, enter the name of the table to be created and the number of columns(1) then click on the "Run" button(2).
A new page will appear allowing you to configure the columns in your table.
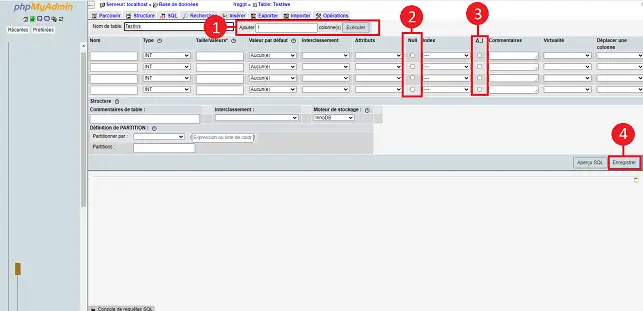
On this page, you can add new columns (1), enter a name, a value type (string, number, etc.), a maximum size for the values, whether you allow null or empty values (2), define a primary key (Index) and activate auto-incrementing of the value for each new record (3).
Once the records have been created, you need to click on"Save" (4) to definitively validate the creation of the new table.
To create a record, select the database concerned (1 ) then, once the list of tables has been displayed, select the table (2) where you wish to add a record, then click on the Insert menu (3).
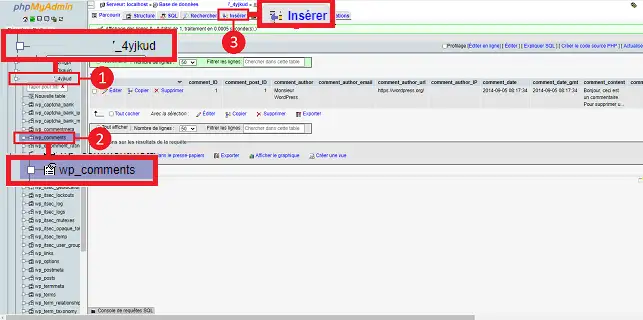
A page similar to the screenshot below appears, where you can enter the values you want (respecting the type of value in the record: number, character string, etc.).
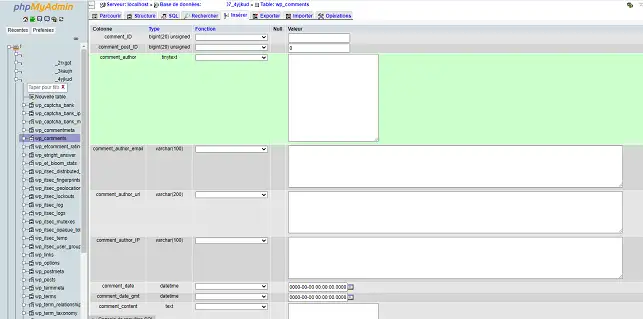
Once you have entered the values, click on"Execute" to add the new record definitively.
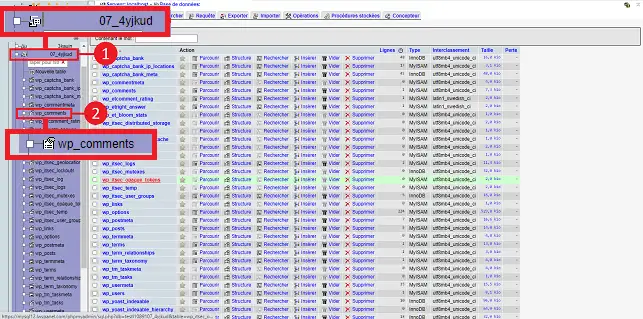
To modify a record, first select the database concerned (1) and then click on the table (2 ) for which you want to modify the record.
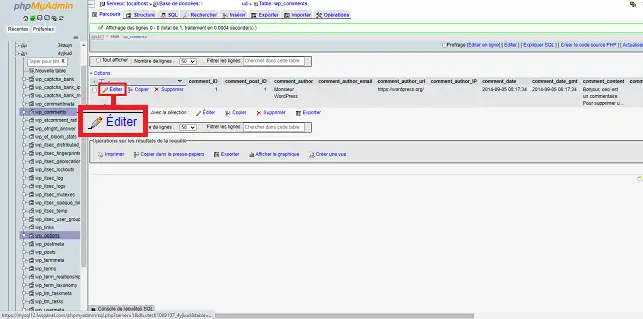
To modify a record, click on the'Edit' link to the left of each record.
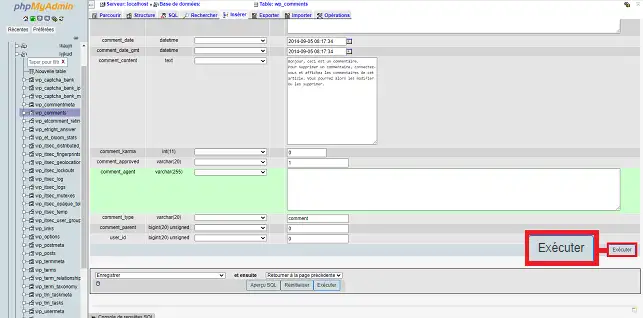
Modify the various fields as required. Note that you must respect the'Type' of each line (varchar, datetime, password, etc.). Once you have entered the various values, click on the"Execute" button at the bottom of the page to save your request.
Select the database(1) for which you have a table to empty and click on the"Empty"(2) tab located behind the table concerned.
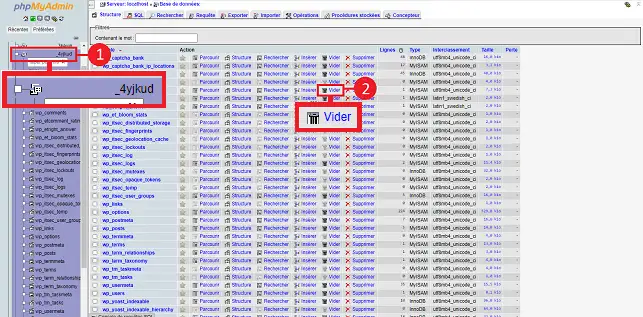
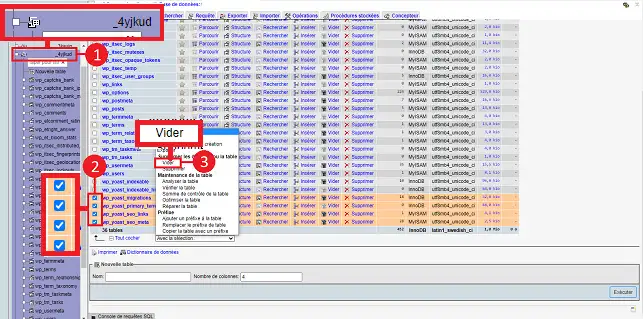
If you wish to empty several tables simultaneously, select the database(1 ) for which you wish to empty certain tables. Tick the boxes(2 ) in front of the boxes to be emptied and select"Empty"(3) in the drop-down window.
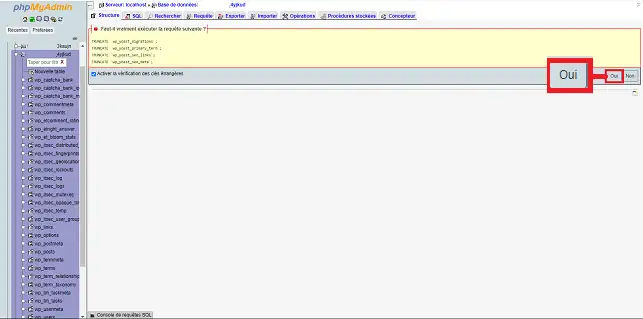
Click on the"Yes" button to confirm that you wish to delete the data from your various tables. Please note that this action cannot be reversed.
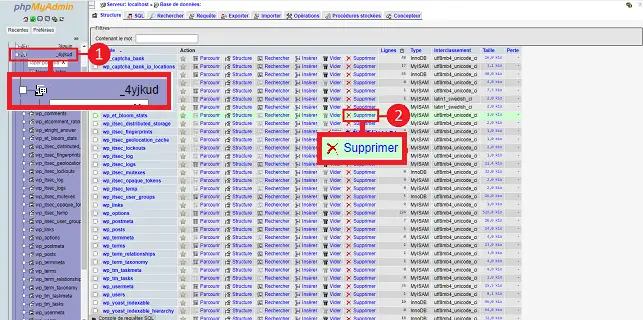
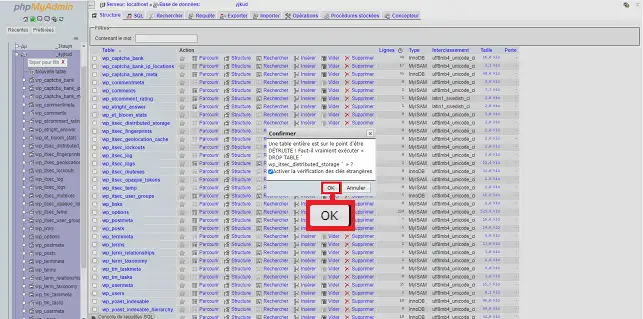
Select the database(1 ) for which you have a MySQL table to delete and click on the"delete" tab behind the table concerned.
A new window will open asking you to confirm the deletion of your table. Click"Ok" to confirm. Please note that this action is irreversible.
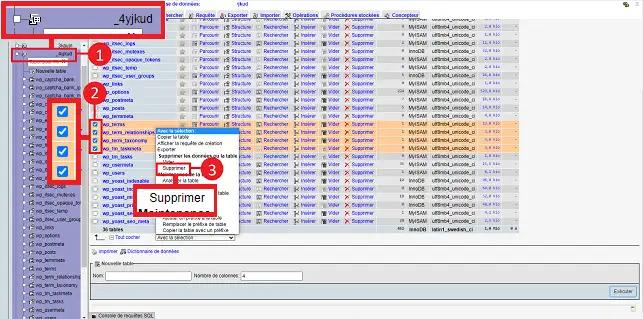
To delete several tables, select the database for which you want to delete several tables, select the tables concerned by ticking the box in front of each one and select delete in the"With selection" drop-down window.
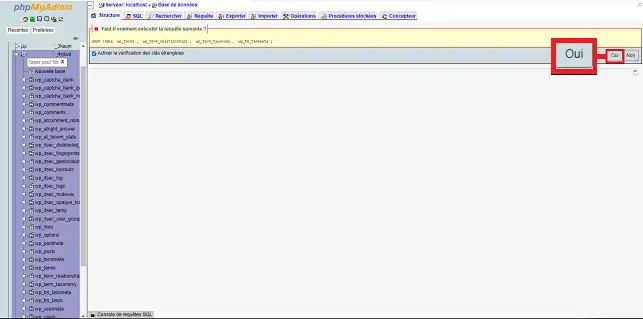
Click on the"Yes" button to proceed with deleting your tables. Please note that this action cannot be reversed.
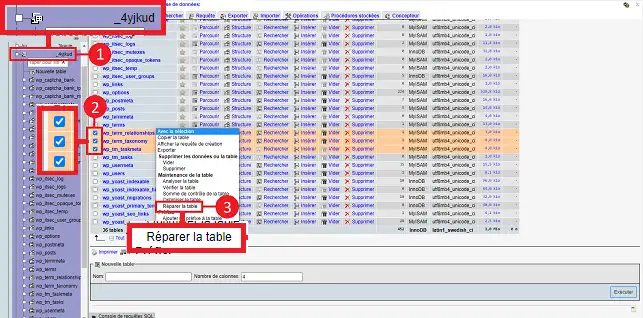
Select the database for which you want to repair the tables. Tick the boxes in front of the tables you want to repair and select"Repair the table" in the "With selection" drop-down window at the bottom of the page.
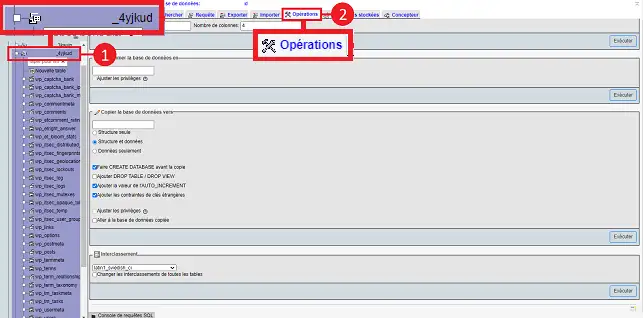
Select the database for which you want to change the sort order and click on the"Operations" tab in the menu at the top of the page.
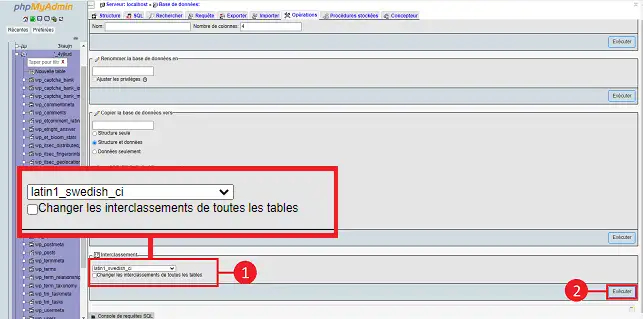
Then modify the collation from the drop-down menu (1) and press the"Execute" button (2).
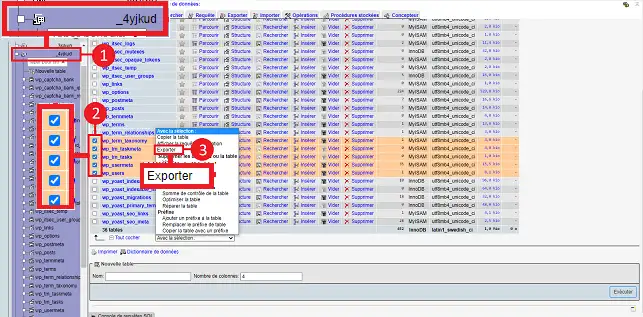
Select the database for which you wish to export tables. Tick the boxes in front of the tables you wish to export and select"Export" from the"With selection" drop-down window.
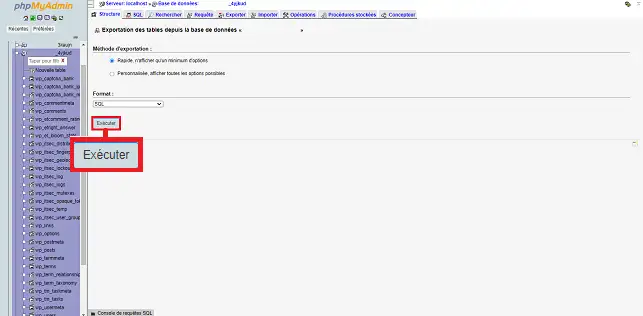
Click on the"Execute" button to save the selected tables on your computer.
Select the database you wish to export and click on the"Export" tab at the top of the page.
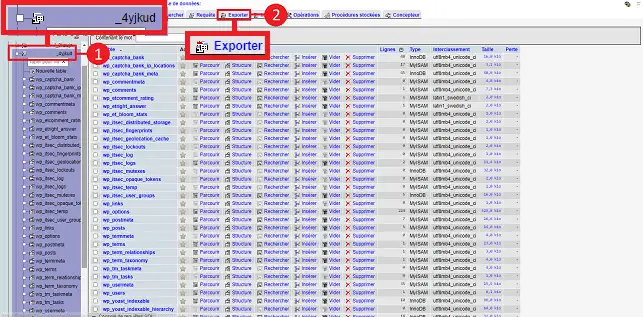
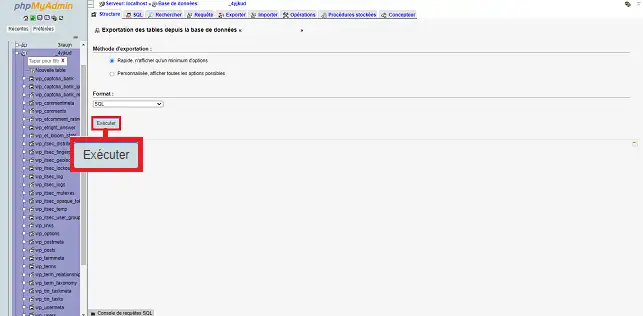
Choose the"SQL" format in the drop-down window and click on the"Execute" button.
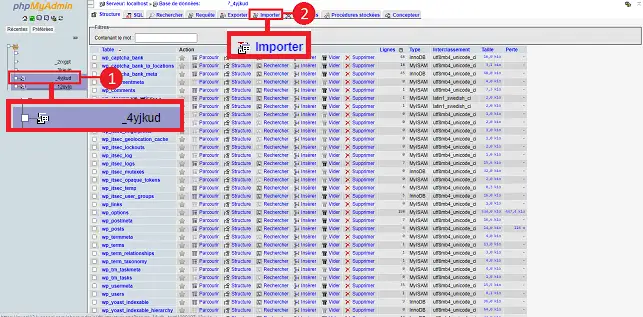
Toimport a MySQL database, once you have logged into PHPMyAdmin, click on the database you wish to import. Then click on the"Import" button.
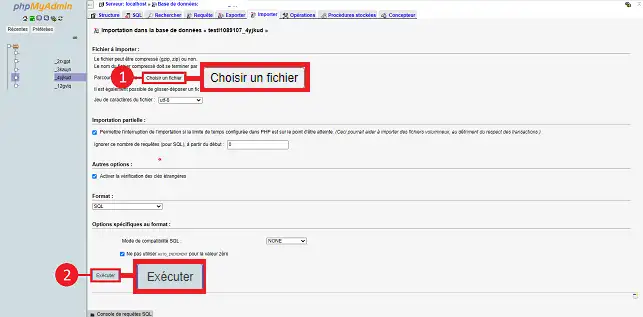
Choose the file you wish to import by clicking on the"Choose a file" button. The file can be in Gzip, Zip or SQL format. Finally, click on the"Execute" button at the bottom of the page.
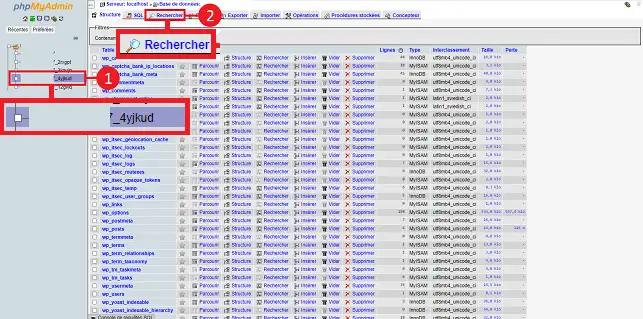
You can search one or more MySQL tables. To do this, click on the database you want to search and then on the"Search" button at the top of the page.
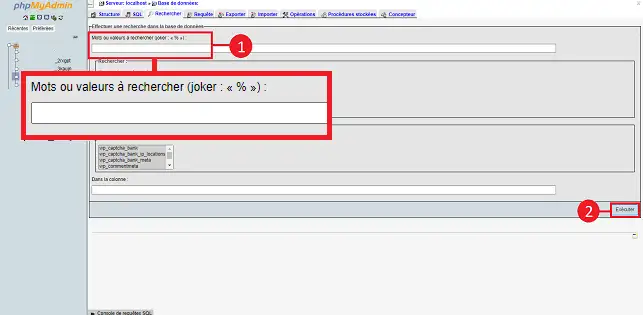
Enter the keyword you are looking for in the"Search words or values" field and click on the"Execute" button at the bottom of the page.
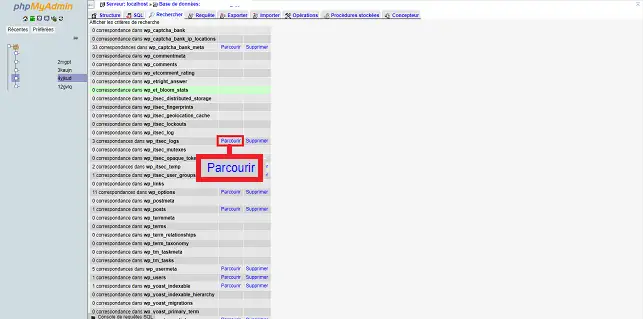
You can open a found record by clicking on the 'Browse' tab behind the line for which a match has been found.
You are now able to manage your MySQL database on your shared hosting with LWS. It is advisable to empty certain tables regularly, such as the tables containing your website logs.
Don't hesitate to share your comments and questions!
Rate this article :
5/5 | 1 opinion
This article was useful to you ?
Yes
No