Rate this article :
3/5 | 2 opinion
This article was useful to you ?
Yes
No
Vous avez noté 0 étoile(s)
Sommaire
Procédure
If you don't know how to connect to the pterodactyl panel of your Minecraft VPS, please follow this documentation.
You are now on the panel's servers page. As no server has yet been configured, this page is currently empty. To install your first Minecraft server, click on the gears at the top right which correspond to the Administration part of the panel.

Then click on "Servers" in the left-hand menu, then on "Create New" in the top right-hand corner.

This takes you to the server creation page. Give your Minecraft server a name and a description, and enter the contact email address for your LWS account in "Server Owner", which corresponds to the panel's admin user.

By default, port 25666 is configured so that you can launch your first server quickly. However, if you want to configure your own port (and it's advisable to do so!), you can do so here. Minecraft's default port is well known to robots), please follow this documentation on allocating new ports.

The "Resource Management" section defines your Minecraft server's resource quotas! If your minecraft server is the only one on your VPS, you can enter "0" in memory quota and disk space in order to have all the quotas of your VPS for it.

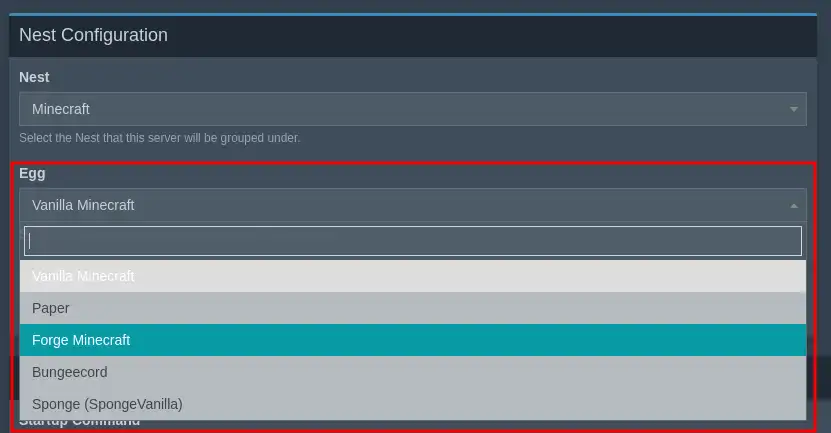
In the "Nest Configuration" section, you can choose the type of Minecraft server you want to install. If you want a "Vanilla" installation, follow step II.a, for the installation of a forge version of Minecraft, go to step II.b.
Select "Vanilla Minecraft" in the "Egg" section.

Finally, in the "Service Variables" section, you can define the version of Minecraft you want to install. If you want the latest version available, leave "latest" in the "Server Version" field, otherwise enter the version you want. Then click on "create Server" at the bottom right.

If you see the validation message in a green rectangle, well done! Your server has now been created and is being installed! 🎉 To view it and perform the first actions on it, click on the button circled in red in the screenshot below:

All that's left to do is click on "Start" and then accept the Minecraft Server terms of use in order to enjoy your Minecraft server with your friends. 😁
Select "Forge Minecraft" in the "Egg" section.

Seelction the full version of forge you want to install in the field provided. This can be obtained from the official Forge website.
For example, for Minecraft version 1.20.1, the latest version of forge is 1.20.1-47.3.10 (without spaces):


Then click on "Create Server". If you see the validation message in a green rectangle, congratulations! Your forge server has now been created and is being installed! 🎉 To view it and perform the first actions on it, click on the button circled in red in the screenshot below:

All that's left for you to do is add mods via this documentation, click on "Start" and then accept the Minecraft Server terms of use in order to enjoy your Minecraft server with your friends. 😁
You now know how to :
Thanks to these simple but essential steps, you're ready to dive into the Minecraft adventure with a server that's just like you! 🎮🌐 Whether you're playing with friends or starting a community of players, you've got all the keys you need to get started on this epic experience. 🚀
We hope you've found this guide useful and thank you for reading. If you have any questions, tips to share, or simply want to give us some feedback, please don't hesitate to leave a comment below. Your opinion is valuable and helps us to continue improving our services for you! 📝💬 Thank you and enjoy playing on your new Minecraft server! 😄
Rate this article :
3/5 | 2 opinion
This article was useful to you ?
Yes
No
32mn reading
Guide to administering your Minecraft server
0mn reading
How to add a custom port to your minecraft server
0mn reading
How to install Minecraft mods on Pterodactyl
0mn reading
How to connect to your Minecraft Pterodactyl panel