Rate this article :
This article was useful to you ?
Yes
No
Vous avez noté 0 étoile(s)
Sommaire
Procédure
CapRover template already configured
A root domain (e.g. vpsXXXX.serveur-vps.net) pointing to the IP of the machine and HTTPS enabled.
npm install -g caprover
This CLI tool centralises connection to the server, creation of apps and deployment on CapRover.
mkdir my-app && cd my-app && npm init -y && npm i express
Create a minimal index.js file :
const express = require('express') const app = express() const port = 3000 app.get('/', (req, res) => { res.send('CapRover + Node + LWS = ❤️') }) app.listen(port, () => { console.log(`Example app listening on port ${port}`) })
Don't forget to modify the package.json in order to define a start command, your file should look like this :
{ "name": "my-app", "version": "1.0.0", "description": "", "main": "index.js", "scripts": { "start": "node index.js" }, "keywords": [], "author": "", "license": "ISC", "dependencies": { "express": "^5.1.0" } }
captain-definition fileTo the root of the repo (next to package.json) :
{ "schemaVersion": 2, "templateId": "node/20" }
schemaVersion remains at 2.
In templateId, you can put any official version of Node available on Docker Hub; here we choose 20.
No need to write a Dockerfile as long as your application is simple.
git init; git add .; git commit -m "First version."
caprover login
Follow the questions :
CapRover machine URL address: https: //captain.vpsXXXXXX.serveur-vps.net
CapRover machine password: admin password
CapRover machine name: captain-01 (the name you give to the local machine you are working on)
The session is now saved locally!
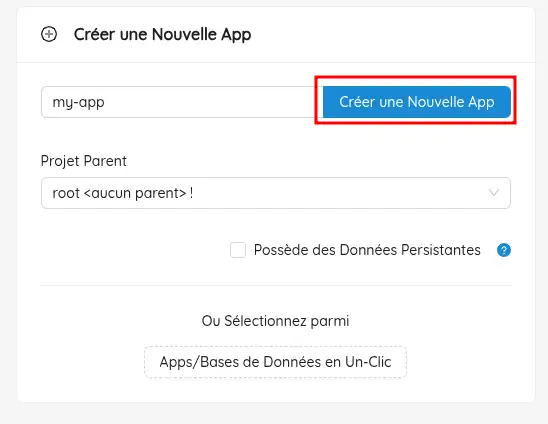
Via the "Create a new App" web interface.
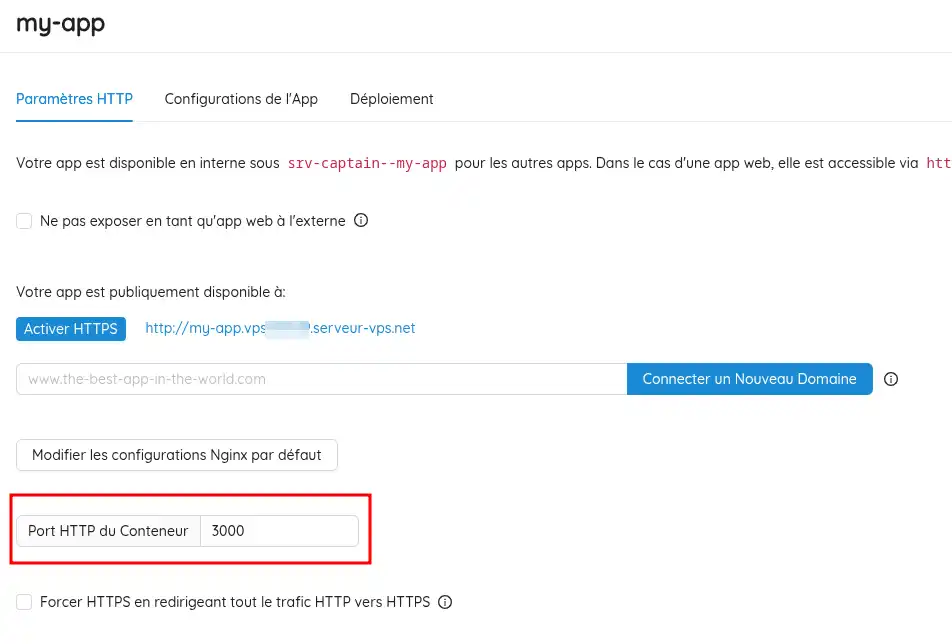
Give it a short name (e.g. my-app); Click on your application, and set the HTTP container port to "3000". CapRover will redirect the PORT that your code listens to to port 80.


caprover deploy
Select :
the server (if several)
the app(my-app)
the branch(master/main)
Y
The CLI :
zips your sources,
sends the archive,
builds the image,
starts the container and shows the caprover.com logs.
In the CapRover interface: my-app → HTTP settings → Enable HTTPS (Let's Encrypt, automatic).
Open https://my-app.vpsXXXXX.serveur-vps.net (or the URL provided).
git add . git commit -m "New feature" caprover deploy -d
( the -d option means: reuse the previous options)
You now know how to :
package.json file.captain-definition file to define the version of Node.js used.🚀 By following these steps, you are now able to launch a Node.js application on a VPS server using CapRover, a powerful tool that simplifies container orchestration. You can now take advantage of the flexibility and speed of continuous deployment for your web projects.
Thank you for reading all the way through! If you have any questions, feedback or just want to share your experience with CapRover, please feel free to leave a comment below 👇. Your feedback is valuable and helps us improve our content! 😊
Rate this article :
This article was useful to you ?
Yes
No
0mn reading
How to use the Docker CE KVM template
0mn reading
How to use the Gitlab CE KVM template
0mn reading
How do you install n8n on your CapRover VPS KVM template?
0mn reading
How to use the Cloudron KVM template