Rate this article :
1.5/5 | 2 opinion
This article was useful to you ?
Yes
No
Vous avez noté 0 étoile(s)
Procédure
With a market share of almost 45%, it's highly likely that your website runs on WordPress. And it's equally likely that you want to protect your site and the data stored on it, to comply with the RGPD law for example.
Among the various ways of securing your site, protecting the administration page (wp-admin) and the login page (wp-login) is a good place to start. It is through these pages that hackers will try to gain access to your site, so it is important to secure them.
It's actually very simple: just replace the connection URL with another address of your choice, which only you will know, and deactivate the wp-admin URL.
By doing this, an ill-intentioned person won't have access to the login page and won't be able to try to log in. In addition, this could deter any hacking attempt, as the hacker might think that this is not a WordPress site.
LWS Hide Login makes it very easy to secure the administration of your site by automatically redirecting anyone trying to access it to an error page without you having to configure it. By default, the plugin does not automatically redirect; you will need to configure it. This avoids problems such as unintentional activation, which would block the entire site.
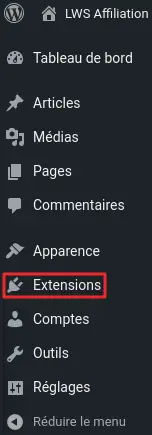
Before installing the LWS Hide Login plugin, log in to your site administration first. After logging in, click on "Extensions" in the left-hand menu to go to plugin management.

Locate the "Add" button at the top of the screen. Click on it to continue.

Search for LWS Hide Login in the search bar and install the plugin. Once installed, you can click on the "Activate" button to activate your plugin.

The plugin is now functional, but the administration and login pages are not yet redirected, so you still need to configure them.
To configure your own redirections, go to the "LWS Hide Login" tab on your dashboard.

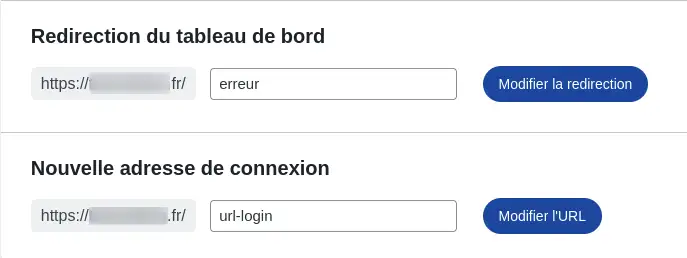
Here, enter the name of the page you want to use for redirects and the new login URL.

For example, if you want your visitors to be redirected to the "error" page when they try to access your administration page, simply enter this name in the "Dashboard redirection" field and then click on the "Modify redirection" button.
Enter the URL you wish to use to connect to your dashboard in the "New connection address" field, then click on the "Modify URL" button.
[
And that's it, the plugin is configured and ready to use straight away. If you change your mind and want to change pages, simply come back here and change the necessary fields.
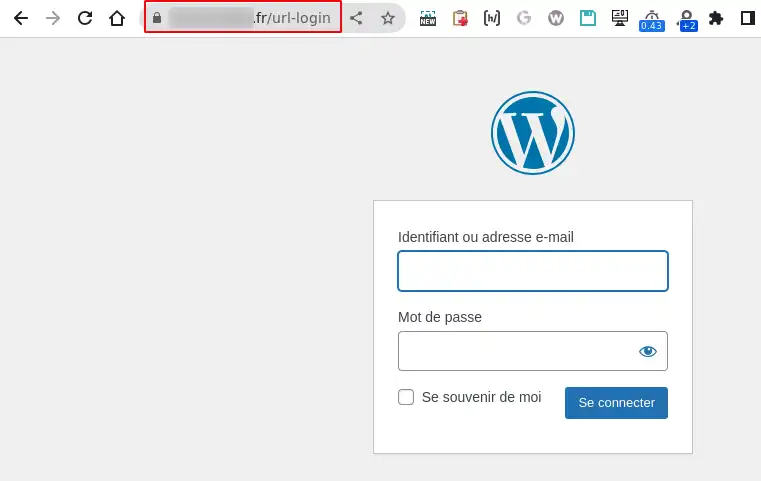
If I go to the new address, I can log in:

However, accessing the "wp-admin" page will automatically send me back to the "error" page.
You now know how to :
🔐 Thanks to these measures, your WordPress site gains in security and effectively deters malicious attempts. You can now browse with the confidence that your admin space is better protected. 🛡️
Thank you very much for your careful reading! 😊 If you have any questions, feedback or need further advice, please don't hesitate to leave a comment. Your interaction is valuable and helps us to continually improve our services. 💬
Rate this article :
1.5/5 | 2 opinion
This article was useful to you ?
Yes
No
2mn reading
How do I activate an https url on Wordpress?
3mn reading
How to secure your Wordpress site
0mn reading
How can you force HTTPS protocol on your Wordpress site?
2mn reading
How do I unblock a blocked IP on Wordpress?
Bonjour,
Merci de votre retour.
L'erreur que vous rencontrez n'est pas générée par nous, mais par le plugin, alors nous vous conseillons de soit changer de plugin ou alors de demander de l'aide au support du plugin en question.
Dans le cas ou il n'y pas de plugin, nous vous invitons à contacter notre service support à travers votre espace client, afin de vous apporter une aide sur le problème rencontrer. (Contacter le support LWS)
Cordialement, L'équipe LWS