Rate this article :
This article was useful to you ?
Yes
No
Vous avez noté 0 étoile(s)
Sommaire
Procédure
One of the main features of the PrestaShop e-commerce platform is the ability to create and manage several shops within a single installation.
It is much easier to update one instance of the main software and all the modules you use rather than having to back up, upgrade and test several versions and try to align them in terms of data.
In this tutorial, you will learn how to activate and administer Prestashop's multi-store mode.
| PrestaShop Version 1.6.x | PrestaShop Version 1.7.x |
|
|
|
Once you have activated multi-boutique mode, you will find a new "multi-boutique" option in the "Advanced settings" menu - identical for versions 1.6 and 1.7. Click on it to start creating your multi-boutiques.
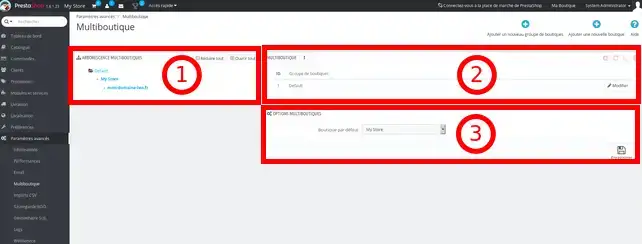
The "Multi-shop" page has three main sections:

1. Multi-shop tree: Displays a tree of your multi-shops, their respective shops and even various URLs associated with a single shop. By default, there is only one shop (located in the default group).
2. Shop Group: Lists the shop groups available. If you want to share your customers, products, orders, etc. between all the new shops you create, you need to make sure your shop group settings are correct, as it's almost impossible to go back once they've been activated. You can have as many groups as you need, but bear in mind that a shop group is a bit like closing all the shops it contains from shops belonging to another group. - The group settings only apply to the shops inside it. Having only one shop associated with a group. You can edit them by clicking on the "edit" icon on the right to rename them.
3. Multi-shop options: Lists the options available for existing shops. The "default shop" is the one that will be used as the master for all the other shops you create (you can import all or some of the details of the main shop into your other shops). It is the one that appears by default when you connect to the Prestashop dashboard (products, carriers, customers, categories, etc.).
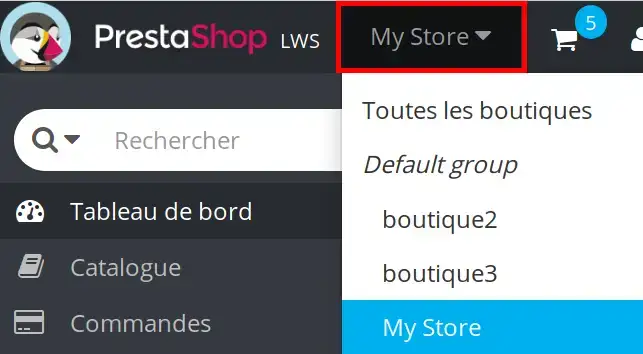
You can manage all your shops from the "My Store" drop-down menu.

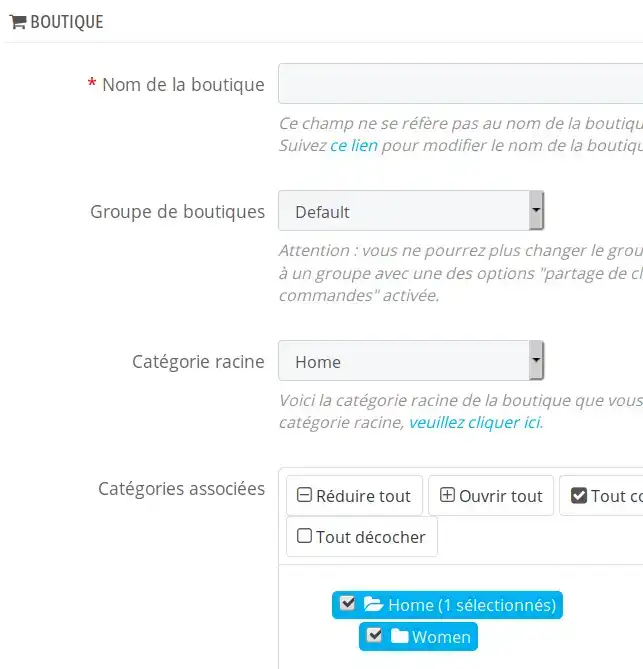
To add a new shop, click on the "Add a new shop" button in the PrestaShop multi-store interface. You will be redirected to a new screen to add the shop details...


Shop name: enter your new shop name here.
Shop Group: choose the "default" shop group you wish to associate your new shop with, i.e. Associate products, categories, etc.
Root category: By default, this will be PrestaShop's default "Home" category. If you need to use another category, you can change it here, provided it has already been created. Otherwise, you will have to create one. Most of the time, the default category is fine.
Associated categories: choose the categories you wish to include / associate with your new shop from the master / default shop. Theme - choose which theme from those already installed you wish to associate and use with your new shop.
Import data: here you choose whether or not to import data from an existing shop, and if you already have several, which one you want to use as the source shop for importing data into your new shop. Tick each option to include them in the import. Note: even if you import the default data at this stage, you can change it later, shop by shop.
Save your details by clicking on the floppy disk icon.
Wait for the new shop to be created - Once this process is complete, you should be able to select your individual shops / shop groups from the drop-down list in the main menu at the top of the screen.
You are now able to activate Multi-shop mode in your Prestashop on your shared hosting with LWS.
Don't hesitate to share your comments and questions!
Rate this article :
This article was useful to you ?
Yes
No
2mn reading
How do I create a Prestashop online shop?
1mn reading
How do you add an https url to your Prestashop shop?
1mn reading
How to change your shop title on prestashop 1.7
0mn reading