Rate this article :
This article was useful to you ?
Yes
No
Vous avez noté 0 étoile(s)
Sommaire
Procédure
Divi builder is included in ourWordpress web hosting packages. If you would like support for DIVI builder, you must subscribe to a licence directly on the Elegent theme Divi website.
LWS offers 3 premium plugins from Elegant Themes (Divi, Bloom and Monarch). These are regularly updated. Once you are an LWS customer, you will have free access to these plugins by choosing the 'Divi Builder' distribution when installing the Wordpress CMS with our Auto-Installer.
If you have a cPanel package or have already installed Wordpress with this distribution, but do not have access to all the themes or updates, please let us know by giving us the access details for the administration area of your Wordpress site so that a technician can update the licence.
Please note: you will need to take out an Elegant Themes licence to benefit from support. LWS does not provide support for these products.
Bloom is an opt-in email plugin designed to help you grow your mailing list. Bloom works by adding email sign-up forms to your website, each of which can connect to your email marketing or newsletter software. When someone signs up using the Bloom opt-in form, they are added to your mailing list. Bloom works with tons of email marketing software and allows you to create different types of opt-in forms that appear on different areas of your website and in different forms (such as pop-ups, fly-ins or normal online forms).
Before you can create a working opt-in form on your website using Bloom, you first need to connect Bloom to your email marketing software. Bloom works with a number of different systems, such as MailChimp, Constant Contact, MadMinim, iContact, InfusioSoft, Feedblitz, Aweber, Campaign Monitor, GetResponse, SendInBlue, MailPoet and Ontraport.
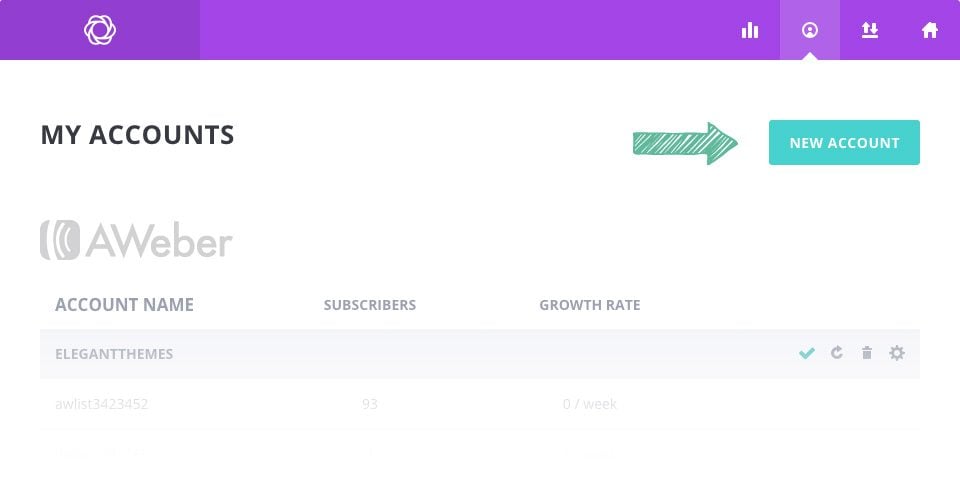
The first thing you want to do when using Bloom is to connect one of these accounts. Click on the Bloom link in your WordPress dashboard to access the Bloom settings, then click on the accounts icon to open the Accounts tab. To add a new account, click on the New Account button, here you can choose between the different account types supported by Bloom. After selecting an account, you will be prompted to verify the account so that Bloom can connect to the system API . Each account may have a different verification method, but in most cases you will be asked to add your unique API key or AppID, which can be found in your email marketing software's online account. For full step-by-step instructions on how to set up each type of account, please see our accounts tutorial. Our accounts tutorial explains exactly how to connect Bloom to each of the different systems it supports.
Once you've added an account, it's time to create your first opt-in form.
To create an opt-in form, click the Bloom > Optins Forms link in your WordPress dashboard, or click the Bloom icon in the WordPress dashboard to open the main settings tab. Here you can manage opt-ins you've created in the past, as well as create new opt-ins. To create your first sign-up form, click on the"New Optin" button. This will reveal the 6 types of opt-in that Bloom supports.
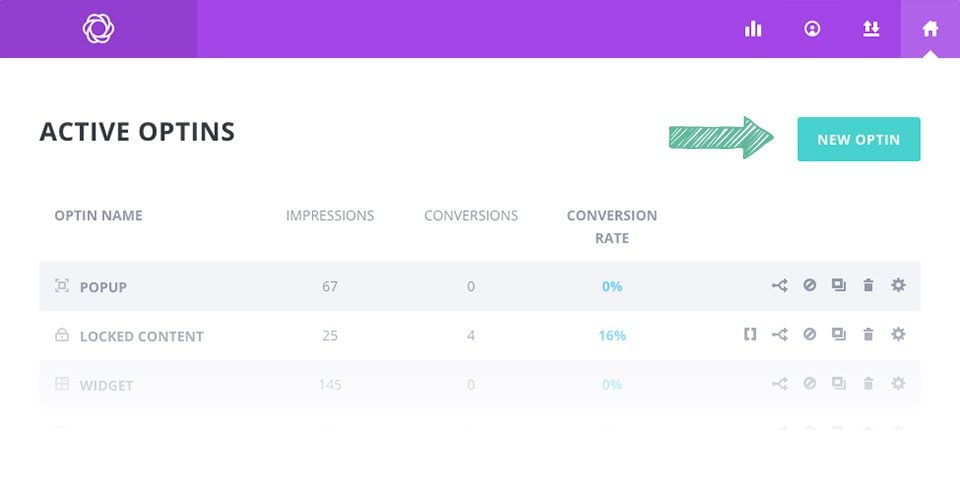
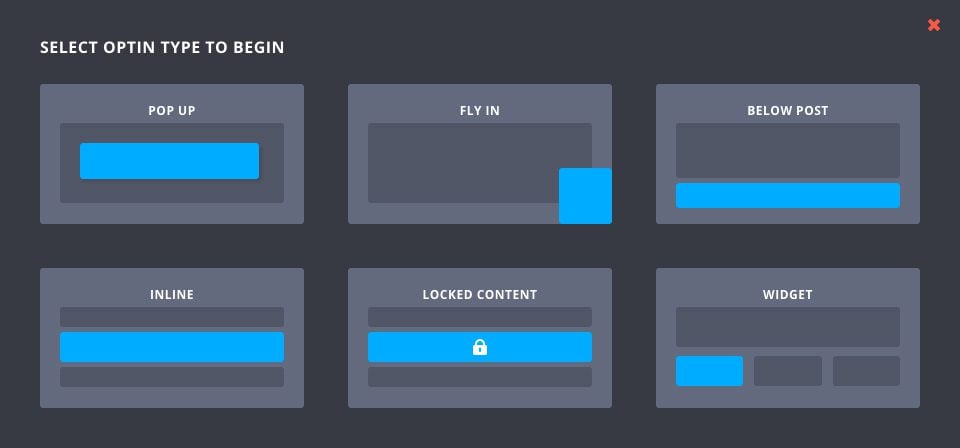
Bloom allows you to create 6 different types of opt-in forms. There is no limit to the number of forms you can create, and these forms can be displayed on unique areas of your website.
The opt-in pop-up creates a pop-up window on your page that contains your opt-in form. These pop-ups can be triggered using different Bloom triggers, giving you additional control over when users are presented with the pop-up. For more information on the opt-in pop-up, be sure to read our in-depth pop-up tutorial .
The fly-in is similar to the pop-up, but a little smaller and more subtle. Instead of creating a full-screen lightbox, the fly-in creates a smaller form that slides up from the bottom corner of the page. Like the pop-up, these fly-ins can be triggered by different user interactions using Bloom triggers.
This is perhaps the most common type of opt-in. This creates a registration form which is automatically added to the bottom of your articles or pages. When a visitor finishes reading your post, they receive a registration form that allows them to subscribe to updates from your blog.
Inline opt-in allows you to add an opt-in form anywhere within your articles and pages. The opt-in form automatically generates a short code that can be pasted inside your articles and pages to display the form anywhere on your website.
Locked content is a great way to build your mailing list by asking visitors to sign up before they can access content on your website. You can lock the content of a message, for example a link to download free resources. Once the visitor subscribes, they have access to the content hidden behind the form. Locked content opt-ins automatically generate a short code that you can place in your messages, wrapped around the content you want to"lock".
The opt-in widget automatically generates an opt-in in the form of a widget. Once generated, the widget will appear in the Widgets tab of the WordPress dashboard, allowing you to add the form to any widget area of your website (such as the sidebar or footer).
Once you've selected your opt-in type, you'll be taken to the opt-in creation screen where you can adjust the various opt-in settings. These settings are divided into three categories: Setup, Design and Display.
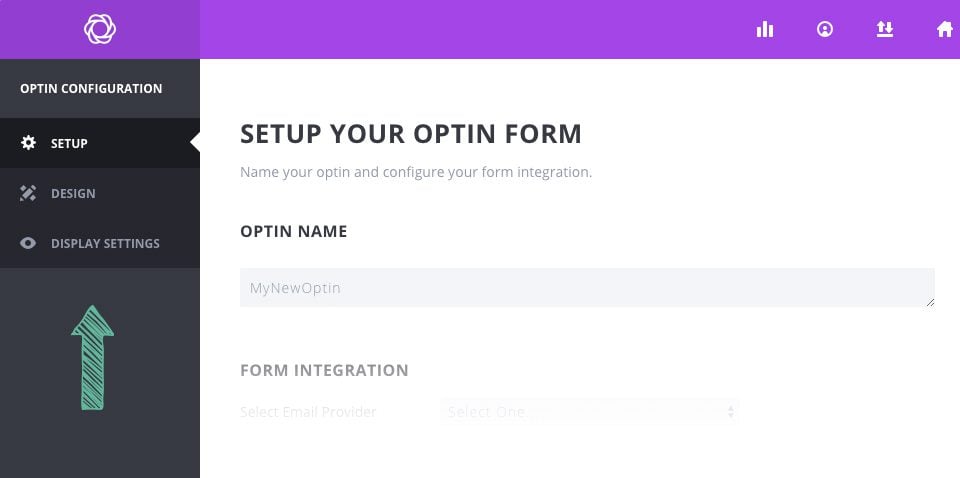
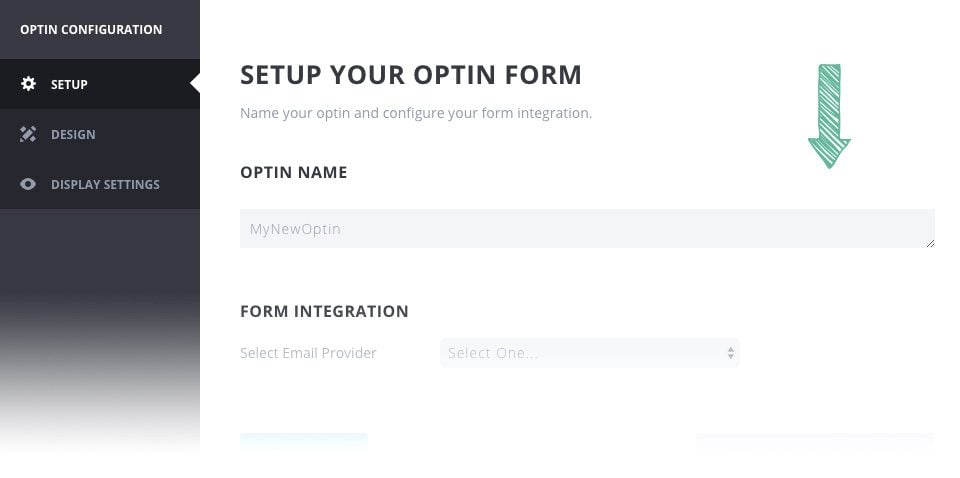
The first page of the opt-in creation form is the Configuration tab. Here you can adjust the name of your opt-in form, which is simply a way for you to remember the form. It will be a reference on the home page tab and in your statistics. You can also add a new opt-in account on this page if you haven't already done so via the Accounts tab. If you have already created an account, you can select it here. Once you have selected an account, you will be given a list of emails associated with that account. Select the list from the drop-down menu that you wish to use, then proceed to the next page. Once your registration form is online, subscribers will be added to the list/account you have selected here.
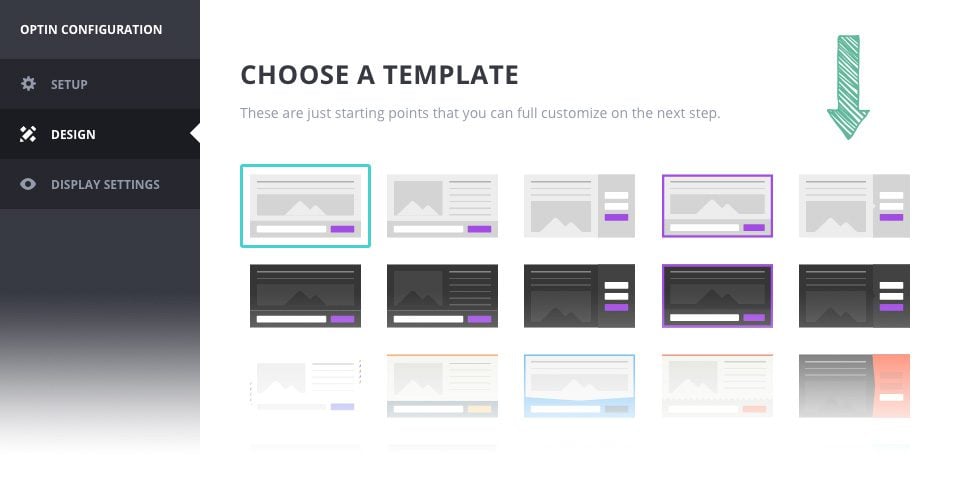
The next step is to design your opt-in form. Once you go to the design tab, you will first be presented with a list of predefined templates. Think of these as starting points. Elegant Themes has put a lot of work into creating over 100 design variations that we think look great. Browse through the thumbnails and select a variation that looks good to you. Don't worry, you'll still be able to customise everything on the next page. Once you've selected a template starting point, click the next button to display the template customisation settings.
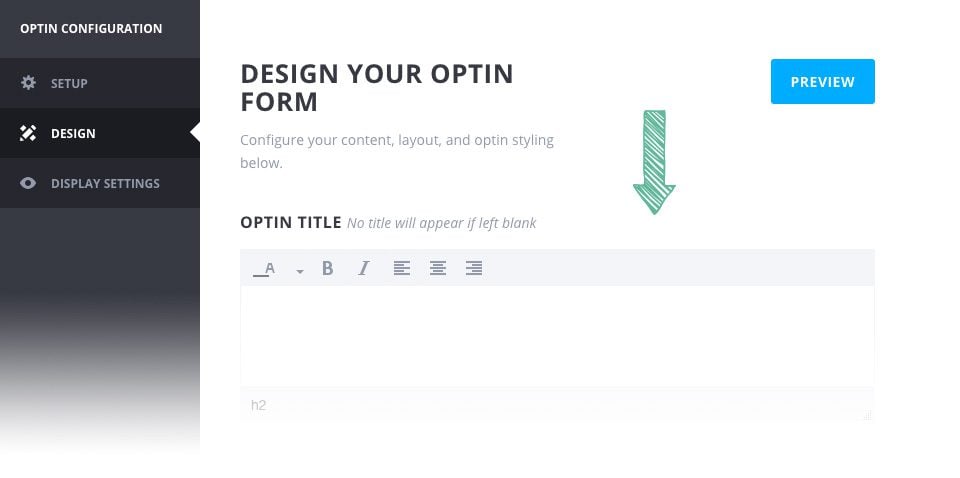
These settings allow you to adjust every aspect of the appearance of your application form. You can do simple things like change the title, description and image, or more advanced things like adjust the form's background colour, text colour, orientation, image, border style and more. Using these different design parameters in combination, you can build just about anything. You can also preview your custom form at any time by clicking on the"Preview" button on the right-hand side of the page. Once you have finished designing your opt-in, click on the"Next" button to move on to the display settings.
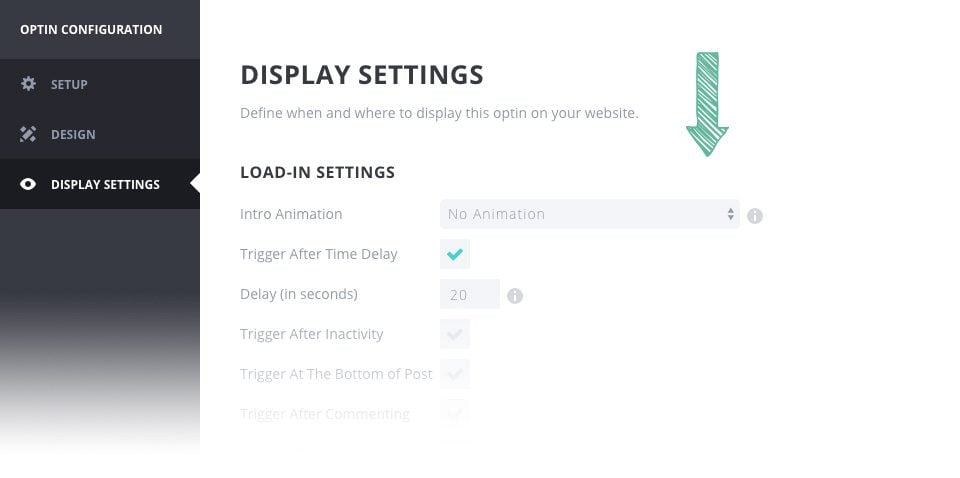
The opt-in display settings control how, where and when your opt-in forms appear. You can choose to display your opt-in form on specific message types or categories. You can also target individual posts and pages, or exclude them. (Note: These settings do not exist for inline or locked-content opt-in forms. These forms are displayed using short codes and therefore these settings do not apply. If you have created an Inline or Locked Content form, you will be presented with a"Generate Shortcode" button. Simply copy and paste this shortcode into any article or page to display the registration form.
For example, if you want your registration form to be displayed on all your articles, but not on any of your pages, you would select"Display on : Articles", leaving the other sections unchecked. If you only want your registration form to appear on one page, leave all the fields under"Display on" unchecked, then use the"Display on these pages" section to target a specific page. If you want your sign-up form to be displayed across your entire website, with the exception of a single post or page, you can select Show on : All, then exclude a single page using the"Do not display on these posts" setting. By using these different settings, you can choose exactly where your opt-in form is displayed.
If you create an opt-in fly-in or pop-up, you will also be presented with different triggers. These triggers do not control where your opt-in is displayed, but rather how and when your opt-in is displayed. For example, you can choose to trigger your opt-in form only after a visitor has finished reading your message, or only after a visitor has purchased one of your products.
When you have finished creating your opt-in, click on the"Save and exit" button. This will take you back to the home page of the Bloom control panel. You will see that your new opt-in has been added to the page. You can modify, delete, deactivate or create split tests for this opt-in using the various settings icons.
Once you've created opt-in forms, you'll notice that each form appears on the home page of Bloom's settings panel. Each of these options can be easily managed from this page. You can do various things with each opt-in using the settings icons that appear to the right of the opt-in name.
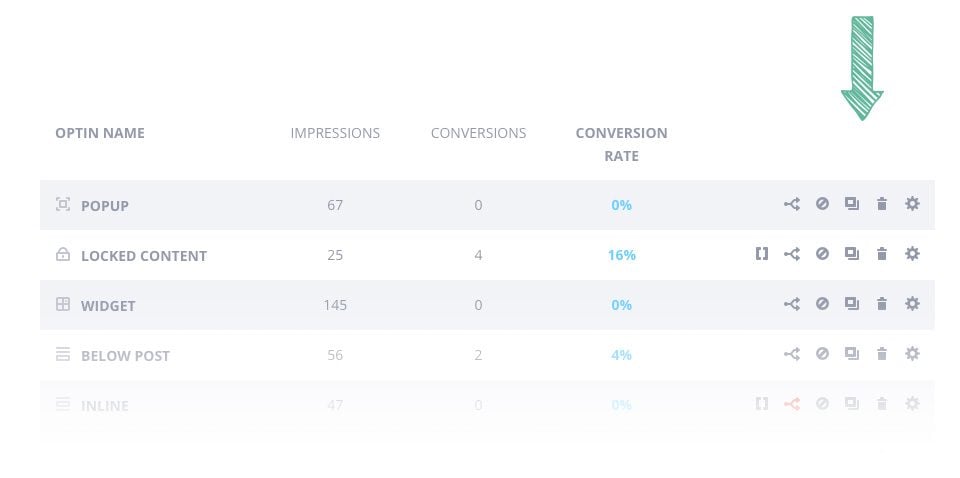
Generate a short code
Shortcode icons will appear for all locked content and online opt-ins. Clicking on this icon will display the shortcode required for that specific form. Copy and paste the shortcode.
Split Test - Split testing is a great way to optimise your opt-in. Initiating a split test allows you to create several variations of the same opt-in form, then test these variations against each other to determine which has the highest conversion rate. Each variation you create will be displayed to different visitors, and their statistics will be kept separately. You can try creating different titles, adjusting different colours, changing images and so on to see how the changes affect user engagement. Each variation will display its conversion rate, making it easy to see which is the most effective. Once you're happy with the results, you can complete the split test and choose the most effective variation.
Deactivate
You can deactivate an opt-in form at any time without deleting it. Once displayed, the form will not be shown on your website and will be moved to the bottom of the page in the list of inactive options. You can save this form for later and reactivate it later.
Duplicate
You can duplicate a form at any time. If you've spent a lot of time designing a form and want to create a new variant based on that design, or if you want to create a different type of opt-in using the same design parameters, you can simply duplicate the opt-in. When you first click on the duplicate icon, you will be given a choice of the type of opt-in you wish to create. Even if the opt-in is duplicated, you can change the type of opt-in while retaining your design parameters.
Delete - If you no longer wish to use an opt-in, it can be permanently deleted.
Modify - You can adjust the parameters of an opt-in at any time. Clicking on the edit icon will take you back to the opt-in creation screen where you can adjust the opt-in parameters using the Setup, Design and Display tabs.
Once you've created your opt-ins, the next step is to understand how effective they are. Using the Bloom statistics page, you can get an idea of how each of your opt-in forms is performing, as well as how quickly your mailing list is growing as a whole.
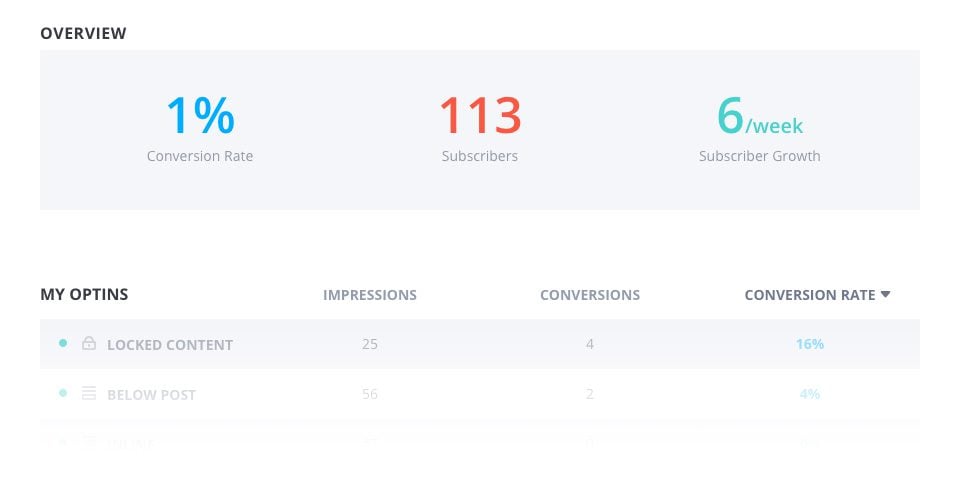
The Bloom statistics page contains a lot of important information, such as overall growth statistics, a detailed overview of the performance of each opt-in form, a historical graph of the growth of your list, as well as information on your best-performing pages.
The Bloom plugin is a great tool that will help you develop your database and encourage your readers to subscribe to your newsletters.
Thank you for following this tutorial and see you soon ;)
How do I install the WordPress Bloom plugin?
> Consult our Bloom plugin help section
Rate this article :
This article was useful to you ?
Yes
No
3mn reading
How do I install the WordPress Bloom plugin?
4mn reading
Adding an email account to Bloom
4mn reading
Using Bloom's Opt-in pop-up
3mn reading
How do you customise your Bloom registration form?